
Raspberry Pi ZeroをJTAG接続デバッグするのを試したことが無かったなあと思い、やってみました。
以前Interface誌の記事を見ながらRaspberry Pi2をJTAGデバッグしてみたときは、結構苦労した記憶があるのですが、今回は割とすんなり進みました。
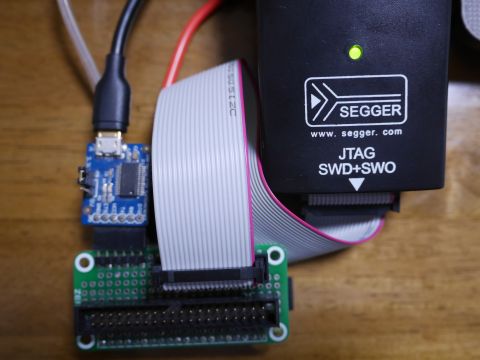
JTAG接続のためのアダプタは、Raspberry Pi2で試したときのものをそのまま使います。
ソフトウェアは、今回はInterface誌の付録DVDではなく、Ubuntu 16.04のOpenOCDとarm-none-eabi-gdbを使いました。
また、Raspberry PiはJTAGを使うためにはGPIOピンの設定をする必要がありますが、これはdwelch67さんのリポジトリにあるソフトウェアを使いました。
raspberrypi/armjtag at master · dwelch67/raspberrypi
コンパイル済みの「armjtag.bin」をSDカードにコピーし、config.txtでこのファイルをカーネルに指定します。
armjtag.binはGPIOを設定した後は無限ループですが、GPIOさえ設定できていれば、デバッグしたいプログラムはJTAG経由で流し込むことができます。
デバッグ対象のソフトウェアは、最適化無し・シンボル情報つきでコンパイルしておく必要があります。
そのためのGCCのフラグは
-O0 -gdwarf-2
です。
今回はMicroPythonをデバッグしてみることにしました。
Makefileを修正して、
$ make DEBUG=1
でデバッグ用イメージを生成できるようにしました。
これをJTAGでデバッグするには、
・JTAGを有効にしたイメージ(何でもよいが上記のarmjtag.binを利用)でRaspberry Piを起動
・JTAGインタフェースでPCと接続し、OpenOCDを起動(cfgファイルは上記のdwelch67さんのリポジトリにあります)
$ openocd -f jlink.cfg -f raspi.cfg Open On-Chip Debugger 0.9.0 (2018-01-24-01:05) Licensed under GNU GPL v2 For bug reports, read http://openocd.org/doc/doxygen/bugs.html adapter speed: 1000 kHz none separate Info : auto-selecting first available session transport "jtag". To override use 'transport select'. raspi.arm Info : J-Link ARM V8 compiled Dec 1 2009 11:42:48 Info : J-Link caps 0xb9ff7bbf Info : J-Link hw version 80000 Info : J-Link hw type J-Link Info : J-Link max mem block 9576 Info : J-Link configuration Info : USB-Address: 0xff Info : Kickstart power on JTAG-pin 19: 0x0 Info : Vref = 3.319 TCK = 1 TDI = 0 TDO = 0 TMS = 0 SRST = 1 TRST = 1 Info : J-Link JTAG Interface ready Info : clock speed 1000 kHz Info : JTAG tap: raspi.arm tap/device found: 0x07b7617f (mfg: 0x0bf, part: 0x7b76, ver: 0x0) Info : found ARM1176 Info : raspi.arm: hardware has 6 breakpoints, 2 watchpoints
・別のウインドウでarm-none-eabi-gdbを起動し、OpenOCDのサーバ(localhost:3333)へ接続
$ arm-none-eabi-gdb
(gdb) target remote localhost:3333
Remote debugging using localhost:3333
0x00000000 in ?? ()
(gdb)
・いったんRaspberry Piで実行中のソフトウエアを再開して停止する
(gdb) continue
Continuing.
WARNING! The target is already running. All changes GDB did to registers will be discarded! Waiting for target to halt.
^C
Program received signal SIGINT, Interrupt.
0x00008114 in nlr_jump (val=0x1395f263) at ../micropython/py/nlrthumb.c:87
87	    MP_NLR_JUMP_HEAD(val, top)
(gdb)
・gdbにデバッグしたいソフトウェアを読み込む
(gdb) file build/firmware.elf
A program is being debugged already.
Are you sure you want to change the file? (y or n) y
Load new symbol table from "build/firmware.elf"? (y or n) y
Reading symbols from build/firmware.elf...done.
(gdb)
・ソフトウェアをJTAG経由でRasperry Piに転送する
(gdb) load
Loading section .init, size 0x38 lma 0x8000
Loading section .text, size 0x60940 lma 0x8040
Loading section .rodata, size 0xac7c lma 0x68980
Loading section .rodata.str1.4, size 0x228 lma 0x735fc
Loading section .ARM.exidx, size 0x8 lma 0x73824
Loading section .data, size 0x3f5 lma 0x73840
Start address 0x8040, load size 441369
Transfer rate: 34 KB/sec, 3940 bytes/write.
(gdb)
・デバッグする(ブレークポイントの設定やステップ実行等)
(gdb) b arm_main
Breakpoint 1 at 0x4cbd4: file main.c, line 127.
(gdb) p _start
$1 = {} 0x8000 <_start>
(gdb) jump _start
Line 0 is not in `nlr_push_tail'.  Jump anyway? (y or n) y
Continuing at 0x8000.
Breakpoint 1, arm_main (r0=3818913792, id=3138, atag=0x0) at main.c:127
127	    bool use_qemu = false;
(gdb)
という感じで比較的スムーズに進みましたが、注意点としてはTAG経由で起動した場合、メイン関数に渡される引数がブートローダで起動した場合と異なるという点です。
ARM boot tagへのポインタも渡されません。(このアドレスは0x100と決まっていますので、渡されなくても問題ないのですが、コードの修正は行う必要がありました。)
ともかく、ブレークポイントが置けたりステップ実行ができるのは、やはり便利ですね。
おかげでUSB周りのバグ(Soft rebootに失敗する)が取れました。
Deinitialise時にroot hubのdevice numberを0に戻していないのが原因でした。

コメント